Wednesday, April 26, 2017

Grafting

One of my master gardening classes was all about fruit tree grafting and grape vine pruning. As part of the class I got to take two grape vines home. I chose MN 78 and Baltica grape varieties. Both of these grades are table grapes great for jellies and wine. These grape varieties were pruned directly from the UW Extension office display garden where I take my class, so at least I know they will grow in my zone. They instructor said they made wine with them last year and we might get to sample some, WI requires him to file for a permit to legally serve us one sip. 

I made my first Apple graft. I used Emla 7 a semi dwarf root stock with a honey crisp scion wood. I cut each piece on the bias then cut a groove into each part, sort of like a tongue and groove. It was call the whip method. It's very important to make the root stock cut and the scion cut the same size. This insures the cambium, vascular part inside, lines up. After that I wrapped the two attached sections with a thin rubber band, then wrapped this wax grafting tape around it. 

I soaked everything over night in water. And planted the next day. 

My tiny Apple graft. 


I had to dip the end of each grape vine in rooting hormone. Then stick them in the hole. 


Next step is to protect them from rabbits, deer and the lawn mower with a small cage. Side note that stuff is extreamly sharp after you snip it with the wire cutters I wore leather gloves.

GOOD NEWS!! The 4 apple trees, 2 pear and 2 cherry trees that we planted last April over wintered and all have buds on them!! Yay!! Our thrifty stake and fishing line fence worked keeping deer away too. 


I have been volunteering like crazy, I have to get 24 hours logged to become a master gardener. I went to the tribal preschool and planted seeds. Was a helper for a shiitake growing class and went to my sons preschool and talked maple syrup tapping. I want to mostly work with kids when I become a master gardener. A lot of other people that are master gardeners are retired and work in the flower gardens. I don't really have an interest in flower gardening except for pollinators. 

I have been working with my son more on cooking his own food. Him and all his classmates made their own pancakes. 

I have been assisting him with learning knife skills and requiring he cut his own veggies and make his own sandwiches. He can only handle the knives with me next to him for now. My goal is to work up to his own pocket knife. 

Finally, my first sign of spring in the north woods. (Two days later it snowed.) 


Wednesday, April 12, 2017

Boil

The sap collecting began. My son carries the 5 gallon jugs and the funnel to the trees. I remove the bags and pour the sap into the jugs while my son holds  the jugs steady. He likes to go up the spout and lick the sap drops dripping from the trees. If you want a great work out, carry 5 gallon jugs filled with sap up the long driveway. Each jug weighs about 40 pounds when its full. My six trees produced about 15 gallons of sap.


My husband adjusted the fire pit with fire bricks to rest the grate on. Last year I had the set up in the driveway on cinder blocks and all the blocks cracked. He dug out the front of the fire pit for easier loading of the wood. I start the fire and then go to the wood shed to split more wood. Usually about 2-3 wheelbarrows full of wood lasts the 8 hours of burning.


My Coffeeshop buddy gave me 30 gallons of his sap to boil down again this year. He boils down until he gets sick of it then gives his surplus sap to me. I sat outside from 12pm-8pm all week long burning down sap. Once I got all of the sap evaporated down to fit 30 gallons in the pan I brought it inside to finish it off on the stove so I could keep a close eye on it. This is the stage you have to watch it because it will boil over and make a hot sticky mess. Once the sap hits 219 degrees it syrup and its ready to be filtered and poured into jars.


My 15 gallons boiled down is way lighter


My buddy's 30gallons of sap is way darker than mine
I have been trying to increase the amount of healthy fats I eat so I made Fat Bombs! They are coconut oil, almond butter, coconut flakes, nuts, craisins and extra dark chocolate. I eat these as little snacks when I am craving dessert.

RECIPE:

1 C  Coconut pil
1C   Almond Butter
1/2 C Coconut flour
1/4 C Dried Coconut flakes
1/4 C Craisins
1/4 C Slivered Almonds
2tsp Vanilla
1 tsp almond extract
1 tsp salt
Maple syrup or honey to taste- ok to skip too
1/2 bag dark chocolate chips


I melt everything in a pan over medium heat,


I scoop them into tiny wrappers.


The last step I add 4 dark chocolate chips to each one. Then stick in the fridge to harden up. They are fantastic. They will start to melt at room temp, so they need to be stored in the fridge in a zip lock bag after they harden.

Sunday, March 12, 2017

Schooling & Maple Sap

I was reading that Wisconsin has 4 seasons: Winter Season, Summer Season, Deer Season and Mud Season. This made me laugh because I think it might be correct. I would get rid of Summer Season and replace it with Mosquito Season. A couple weeks ago it got up into the 40s and all of our snow melted and our yard and drive way turned into mud pit again. We had to park the vehicles on the road to keep from making ruts on the driveway. The warm weather made me think about Maple Syrup!!! I tapped my trees and sap was just pouring out of the drilled holes.
Drip by drip to fill the bag.
I attached the blue sap collecting bags and by the next day they were already half full.
After 2 hours.
After 2 hours.
Just as a reminder, it takes 40 gallons of sap to make 1 gallon of syrup. I still have many more gallons to collect.

 Thanks to a tip from my coffee shop buddy I went to the grocery store and asked the Deli for their old vegetable oil jugs. Each jug is 5 gallons and easier to pour out then the 5 gallon buckets I used last year I will fill these jugs with sap to store it until boiling day.
The temperature dropped and the last 4 days it has been about 0 degrees over night and 15 degrees as a high. This means my sap is frozen in the bags and that sap has stopped flowing.
Now I am getting spring fever and want it to warm up a bit for sap collecting and I'm getting annoyed with wearing my winter jacket all the time.

It has been a busy few weeks fled with bees, gardening and Thai cooking classes. My friend and I took a bee keeping class at the Universoty of Minnesota.
It was an 8 hour course and we learned about hive dynamics, bee life cycle, mites and dieases, bee keeping gear, getting stung/ allergic reactions how to paint and stack the boxes and how to collect honey.  Eveything seems great but I really want to work with an established bee keeper before I buy my equipment. Not to mention its about $400 to get all the gear and box of bees to start out with. Actually more  money because I need to figure out a bear proof solution. One solution  is electro fencing in the hive but a friend's husband brought up how bees can sting a bear but it doesn't care and keeps eating honey so it could plow right though electro fence if it wanted to. He suggested maybe a tall chain link dog kennel and putting the bees inside of that. The bear could still climb in if it wanted to. The best part of the whole bee keeping class was my friend taking me out on a date to a wonderful restaurant filled with fantastic food and multiple glasses of wine.


I started a Master Gardener class. This course is 13 weeks long and I have to complete 24 volunteer hours to get my certificate.
I'm very excited to volunteer and work with kids again in the school garden but without all of the bureaucracy and paper work that was need when I was an Americorps volunteer. We will be learning about botany, soil health, disease and many other subjects over the next 13 weeks.

My son and I made a fairy house out of some cut wood from the dead tree harvest. My son picked out all of the figurines. He placed everything where he wanted it and I hot glued everything down. I let him sort through my tiny agates, he used them to make a walking path. It was a very fun project. Now he wants to make a "spooky troll house"


Monday, March 6, 2017

Pruning


 The dead tree harvest continues. This huge aspen could have fallen on the house in a big storm so it came down. The top half was dead.


Its fruit tree pruning season in my part of the country. I know absolutely nothing about pruning trees except you are suppose to do it while they are dormant.  I sat down and spent about an hour reading up on it and watching a few different you tube videos. From what I gathered the whole point of pruning is to 1) to create light exposure for both leaves and fruit; 2) provide uniform distribution of fruiting branches; 3) control the size of the tree; 4) reduce limb breakage due to heavy fruit loads; and 5) produce high quality fruit of good size. I really didn't have to do that much, I sniped a couple branches growing sideways back through the tree. I didn't want to go all crazy and hack apart my trees.


Last fall we were all tapped out of money so we had about $35 budget for a tree fence to protect them from deer. We purchased plastic trunk protectors and built a thrifty fence out of 6ft tall spikes and fishing line with soda cans hanging form it. We tapped in the spikes and wrapped the fishing line around the perimeter of the orchard area at three different levels. Then hung a few soda cans around the fence.
The fishing line is hard to see but its tied on at three different heights.
Yes, I know this is totally insane we live in the middle of the woods with deer tracks in our yard. I know nothing about deer behavior or eating habits beyond they like to eat corn in the fields and ate all of our pumpkins in the garden I volunteered at. The fence is working, we have not had a problem all winter. Or maybe because we compost our toilet waste they smell it and stay away. Who knows!!!!

Next project is we tiled the back splash in the kitchen. The company that installed the counter top warned us to get it done asap to avoid mold growing on the sheet rock. I thought it would be a great winter project. Tiling is annoying. Mostly because you have to be bent over in a weird way applying tiles under the cabinets. I struggled with getting the mud on thin enough.


The other annoying part was measuring and making tiny cuts to fit around the outlets. I had my husband do all the cutting with the saw. We have a really cool neighbor that has a whole collection of tools that he loans us, the saw is one of them. I thought it was going to be a quick 2 hour job, nope, 6 hours later it was completed. I am really happy with the way it turned out. It gives the kitchen some texture to distinguish it from the rest of the house.


My husband made a cat toy. He had my son collect a stick and tied the very end of a squirrel tail onto a it. I think its a little creepy.

Friday, February 24, 2017

Wood harvest

This winter has been milder than last winter so far. We have more than half of our wood left. We burned through all of the wood we bought and are burning the wood we cut last winter. We started harvesting dead trees off our land for next winters firewood so it has several months to dry and cure. My husband cuts and bucks the tree and I haul the logs and stack them. Winter weather of 20 degrees is the perfect temp to do this sort of work, no bugs and you stay nice and cool.


This pile is from two aspen trees, one of which the wood peckers were going after and we split open part of it to discover a colony of frozen flying ants, it was pretty neat.


I have been busy sewing baby bibs and revamping my etsy shop. https://www.etsy.com/shop/handmadebynikki057?ref=search_shop_redirect 
I also was able to connect with a local gift shop to sell my baby bibs there. I am continuing to network and connecting with local people about the summer events and craft shows.


I taught my second class through community ed. It was DIY body care products. We made champagne whipped body butter, alpine sea salt foot scrub with juniper oil and rose clay mud mask. I also threw in some of my homemade sea salt caramels. My class sizes have been small but the student reviews have been positive. I hope they continue to grow. It seems like small towns are always looking for new people to teach their skills through community education. If you have cool skills give teaching a try.

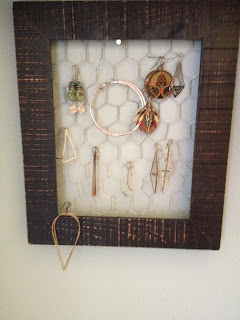
 There was a cold snap for a few days so I got busy crafting. I made an earring holder out of a frame and some scrap chicken wire I got from the neighbor. Now I can hang my earrings and not keep them in a giant pile. 


My son and I kept busy doing science, we made fake snow and gak. My son loved the fake snow and thought the gak was too weird. I will post the recipes below. Both of these projects can be kept in a plastic zip lock bag after and used again.


http://www.funathomewithkids.com/2014/11/magic-puffing-snow-recipe.html


http://www.pbs.org/parents/crafts-for-kids/gak-attack/


Wednesday, February 1, 2017

Chaga

I went for a short winter hike on my property and found some chaga mushroom on my birch tree. I have never found chaga before so I took some pics and consulted a local mycologist to be sure I had identiified it correctly. It sort of looks like rotten wood or bear poop. He confirmed it was chaga.

What is Chaga?   
from:https://www.annandachaga.com/pages/frontpage
"The Chaga mushroom is a unique polypore fungi that grows on living birch trees. A symbiotic relationship is formed between the Chaga mushroom and its host that can sustain one another during their entire lifespan of up to 20 years. 
Chaga Mushrooms may be found on wounded or dying white birch trees in temperate forests around the northern hemisphere. Chaga looks like encrusted black formations; the sterile conk or mycelium grows out of wounds sustained after storms and other impacts that break branches.  Chaga covers the tree's wound and protects it from invading micro organisms.  The host tree and the Chaga can co-exist for many years and the mushroom can be harvested up to three times over the course of its lifetime.  

The Chaga Mushrooms is known as the "King of Medicinal Mushrooms."  Considered by many cultures as one of the most powerful healing plants on Earth and used for centuries in Traditional Chinese Medicine.  After it as been harvested, the Chaga needs to be air dried and broken into chunks or ground into a course or fine powder.  The outer cell walls of Chaga are protected by chitin and need to be broken down or extracted.  Over the centuries chaga has been extracted by steeping it in hot water to make a medicinal Chaga Mushroom Tea or matured into a potent Chaga Mushroom Extract by soaking it in alcohol.  Both the hot water and alcohol methods over long periods of time help to dissolve the chitin protecting the valuable nutritional contents inside the Chaga. 
Chaga Mushrooms have been known to improve the immune response, lower blood sugar levels and combat abnormal cell growth.  Chaga is also anti-inflammatory, relieves pain and purifies the blood and the liver."

I found a saw and cut my chaga off the birch tree. I brought it inside and sawed it into chunks. It was very hard, not soft and spongy like regular mushrooms. I took all the powder from sawing the chunks and stuck it in a jar with vodka to make tincture.

In three weeks I will be able to strain it. I have also been playing around with steeping it for tea. The first batch I steeped 3 chunks in hot water for 1 day. The second batch I have been steeping 6 chunks for 3 days now and increased the water volume. The tea itself doesn't taste bad at all. I like to mix it 50/50 with my other teas I drink. I gave some to a friend of mine that likes mushrooms.

I am surprised with how much my property is proving us in wild edibles and medicinal plants. The more I walk my property and learn the more I find.